[TOC]
本文介绍如何使用Hexo搭建个人博客并托管到GithubPages的过程,使用了Next(6.x版本)的Gemini主题,持续集成工具为travis ci
需要提前安装好git和node.js,并熟悉github的基本操作,访问部分工具需要科学上网
为方便说明 假设你的github名为jay,实际操作时请替换成自己的用户名
新建Github仓库
仓库名为jay.github.io
新建完成后
1 | git clone git@github.com:jay/jay.github.io.git |
这里把仓库clone到了本地,新建并切换到了blog分支
下面的操作都将在blog分支根目录进行(以下简称为根目录),blog分支用于保存源文件,master分支用于发布.不要手动操作master分支
也可以使用两个repo,分别作为源码版本管理的repo和发布的repo,不过一个已经够用了
安装Hexo
hexo详细教程请参考hexo官网,此处列出一些简要步骤
全局安装hexo脚手架
1
npm install hexo-cli -g
在根目录生成hexo网站模板到temp文件夹
1
hexo init temp
复制 temp文件夹中的内容到根目录,并
\themes文件夹下的默认landscape主题,然后删除temp文件夹
约定 根目录下的_config.yml文件为站点配置文件
安装Next主题
1 | git clone https://github.com/theme-next/hexo-theme-next themes/next |
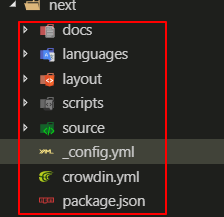
将next主题拷贝至 themes/next文件夹下,删除next文件夹下多余的文件,除了下图红框中包含的文件和文件夹之外全部删除,尤其注意要删除next下隐藏的.git文件夹
约定 next文件夹下的_config.yml文件为主题配置文件
在站点配置文件中启用next主题
1 | theme: next |
在主题配置文件中启用Gemini分主题,去掉#注释
1 | # Schemes |
此时可以在本地调试看一下效果
1 | hexo s |
hexo s是 hexo server的缩写,启动后可以复制地址到浏览器中查看,默认为http://localhost:4000
调整Next样式
基本配置
修改语言,标题等信息
修改站点配置文件
1 | # Site |
顺便在# Site处修改站点标题,作者等信息
修改头像
修改主题配置文件
1 | Avatar |
- url 头像图片网址,也可以使用
/images目录下的文件 - rounded 是否为圆形
- rotated 鼠标hover时是否有旋转效果
修改社交信息
修改主题配置文件
1 | social: |
hexo采用fontawesome字体图标,每个||之前的内容代表文件路径,||之后的内容代表字体图标class,如github的字体图标渲染时class为fa-github
主要样式
\themes\next\source\css\_custom\custom.styl中加入以下代码
1 | body { |
显示宽度
在\themes\next\source\css\_variables\custom.styl增加以下配置信息
1 | $content-desktop = 75%; |
增加其他功能
增加标签和分类
根目录下输入命令,会在根目录的source文件夹下生成categories文件夹和tags文件夹
1
2hexo new page categories
hexo new page tags编辑新建的页面
source/categories/index.md1
2
3
4
5---
title: 分类
date: 2018-10-21 20:34:08
type: "categories"
---编辑新建的页面
source/tags/index.md1
2
3
4
5---
title: 标签
date: 2018-10-21 20:34:08
type: "tags"
---编辑文章模板
scaffolds\post.md1
2
3
4
5
6---
title: {{ title }}
date: {{ date }}
categories:
tags:
---修改 主题配置文件,增加菜单栏
1
2
3
4
5
6menu:
home: / || home
#about: /about/ || user
tags: /tags/ || tags
categories: /categories/ || th
archives: /archives/ || archive
可以使用hexo new "文章名"生成新的文章查看效果,文章的标签和分类实例如下
1 | --- |
一篇文章只能有一个分类,可以有一个或多个标签
增加站内搜索
安装站内搜索插件
1
npm install hexo-generator-searchdb --save
修改 站点配置 文件
1
2
3
4
5search:
path: search.xml
field: post
format: html
limit: 10000修改 主题配置 文件
1
2local_search:
enable: true
本地网站重启后可以查看效果
增加RSS订阅
安装rss插件
1
npm install hexo-generator-feed
修改站点配置文件,在底部增加
1
2
3
4
5
6
7
8# Extensions
plugins:
hexo-generator-feed
#Feed Atom
feed:
type: atom
path: atom.xml
limit: 20修改
themes\next\languages\zh-CN.yml,新增rss: RSS订阅1
2
3
4
5
6
7
8menu:
home: 首页
archives: 归档
categories: 分类
tags: 标签
rss: RSS订阅
about: 关于
search: 搜索修改主题配置文件,在menu中增加rss菜单
1
2
3
4
5
6
7menu:
home: / || home
#about: /about/ || user
tags: /tags/ || tags
categories: /categories/ || th
archives: /archives/ || archive
rss: /atom.xml || rss
使用hexo g生成atom.xml后重启网站查看效果,hexo g是hexo generate的缩写
增加评论区
hexo支持多款评论插件,经过对比之后使用gitalk
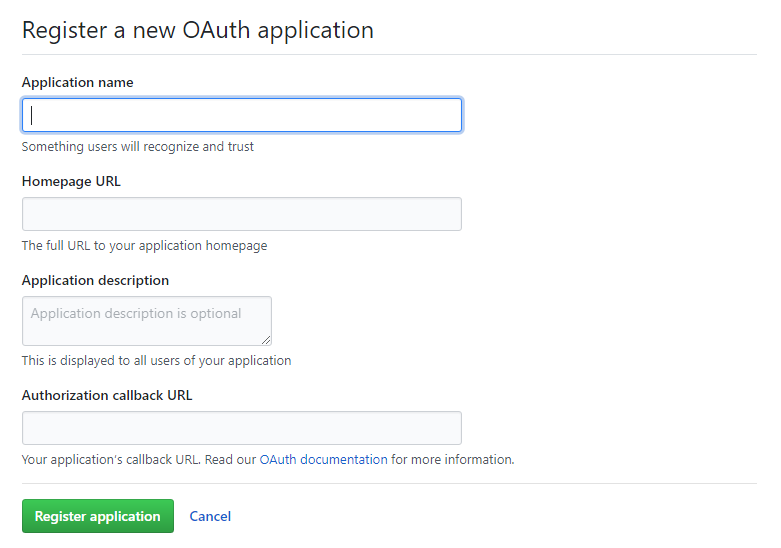
在GitHub上注册新应用,注册地址
参数说明
- Application name: # 应用名称,随意
- Homepage URL: # 网站URL,如
https://jay.github.io - Application description # 描述,随意
- Authorization callback URL:# 网站URL,
https://jay.github.io
点击注册后,页面跳转如下,其中
Client ID和Client Secret在后面的配置中需要用到,到时复制粘贴即可根目录下安装
gitalk1
npm i --save gitalk
修改主题配置文件,增加
1
2
3
4
5
6
7
8
9
10
# Support for LiveRe comments system.
# You can get your uid from https://livere.com/insight/myCode (General web site)
#livere_uid: your uid
enable: true
githubID: jay
repo: 你的github上任意一个公开的repo
ClientID: 步骤1中的ClientID
ClientSecret: 步骤1中的ClientSecret
adminUser: jay
distractionFreeMode: true实际的评论会生成为repo中的issue
新建
themes\next\layout\_third-party\comments\gitalk.swig文件,并添加内容:1
2
3
4
5
6
7
8
9
10
11
12
13
14
15
16
17{% if page.comments && theme.gitalk.enable %}
<link rel="stylesheet" href="https://unpkg.com/gitalk/dist/gitalk.css">
<script src="https://unpkg.com/gitalk/dist/gitalk.min.js"></script>
<script src="https://cdn.bootcss.com/blueimp-md5/2.10.0/js/md5.min.js"></script>
<script type="text/javascript">
var gitalk = new Gitalk({
clientID: '{{ theme.gitalk.ClientID }}',
clientSecret: '{{ theme.gitalk.ClientSecret }}',
repo: '{{ theme.gitalk.repo }}',
owner: '{{ theme.gitalk.githubID }}',
admin: ['{{ theme.gitalk.adminUser }}'],
id: md5(window.location.pathname),
distractionFreeMode: '{{ theme.gitalk.distractionFreeMode }}'
})
gitalk.render('gitalk-container')
</script>
{% endif %}这里用了一个md5,同时采用了
windows.location.pathname来区分不同的文章,md5算法来自https://cdn.bootcss.com/blueimp-md5/2.10.0/js/md5.min.js解决了那个issue label长度不能超过50的问题
引入
gitalk.swig修改
themes\next\layout\_third-party\comments\index.swig,添加内容1
{% include 'gitalk.swig' %}
修改
themes\next\layout\_partials\comments.swig,添加内容(注释的为需要添加的内容,注意取消注释)1
2
3
4
5
6
7{% elseif theme.valine.enable and theme.valine.appid and theme.valine.appkey %}
<div class="comments" id="comments">
</div>
//{% elseif theme.gitalk.enable %}
//<div id="gitalk-container"></div>
{% endif %}
{% endif %}新建
themes\next\source\css\_common\components\third-party\gitalk.styl1
2
3
4
5
6.gt-header a, .gt-comments a, .gt-popup a {
border-bottom: none;
}
.gt-container .gt-popup .gt-action.is--active:before {
top: 0.7em;
}修改
themes\next\source\css\_common\components\third-party\third-party.styl,添加内容1
@import 'gitalk' if (hexo-config('gitalk.enable'));
评论区的正式效果需要发布后才能查看
文章置顶+置顶标签
安装插件
1
2$ npm uninstall hexo-generator-index --save
$ npm install hexo-generator-index-pin-top --save文章模板
scaffolds\post.md1
2
3
4
5
6
7---
title: {{ title }}
date: {{ date }}
categories:
tags:
top:
---在实际的文章中
top:true就可以置顶设置置顶标志
打开:
/blog/themes/next/layout/_macro目录下的post.swig文件,定位到<div class="post-meta">标签下,插入如下代码:1
2
3
4
5{% if post.top %}
<i class="fa fa-thumb-tack"></i>
<font color=7D26CD>置顶</font>
<span class="post-meta-divider">|</span>
{% endif %}
代码块添加复制功能
下载 clipboard.js,并保存到
.\themes\next\source\js\src在1的目录下创建
clipboard-use.js,文件内容如下:1
2
3
4
5
6
7
8
9
10
11
12
13
14
15
16
17/*页面载入完成后,创建复制按钮*/
!function (e, t, a) {
/* code */
var initCopyCode = function(){
var copyHtml = '';
copyHtml += '<button class="btn-copy" data-clipboard-snippet="">';
copyHtml += ' <i class="fa fa-globe"></i><span>copy</span>';
copyHtml += '</button>';
$(".highlight .code pre").before(copyHtml);
new ClipboardJS('.btn-copy', {
target: function(trigger) {
return trigger.nextElementSibling;
}
});
}
initCopyCode();
}(window, document);在
.\themes\next\source\css\_custom\custom.styl样式文件中添加下面代码:1
2
3
4
5
6
7
8
9
10
11
12
13
14
15
16
17
18
19
20
21
22
23
24
25
26
27
28
29
30
31
32
33
34
35
36//代码块复制按钮
.highlight{
//方便copy代码按钮(btn-copy)的定位
position: relative;
}
.btn-copy {
display: inline-block;
cursor: pointer;
background-color: #eee;
background-image: linear-gradient(#fcfcfc,#eee);
border: 1px solid #d5d5d5;
border-radius: 3px;
-webkit-user-select: none;
-moz-user-select: none;
-ms-user-select: none;
user-select: none;
-webkit-appearance: none;
font-size: 13px;
font-weight: 700;
line-height: 20px;
color: #333;
-webkit-transition: opacity .3s ease-in-out;
-o-transition: opacity .3s ease-in-out;
transition: opacity .3s ease-in-out;
padding: 2px 6px;
position: absolute;
right: 5px;
top: 5px;
opacity: 0;
}
.btn-copy span {
margin-left: 5px;
}
.highlight:hover .btn-copy{
opacity: 1;
}
添加引用
在
.\themes\next\layout\_layout.swig文件中,添加引用(注:在 swig 末尾或 body 结束标签(</body>)之前添加):1
2
3<!-- 代码块复制功能 -->
<script type="text/javascript" src="/js/src/clipboard.min.js"></script>
<script type="text/javascript" src="/js/src/clipboard-use.js"></script>
发布
-
1
npm i hexo-deployer-git --save
修改站点配置文件,添加内容
1
2
3
4deploy:
type: git
repo: git@github.com:jay/jay.github.io.git
branch: master将发布到master分支
使用
hexo generate --deploy发布,可以简写成hexo g -d
至此,我们完成了博客的搭建,但是每次有新的文章都要发布,我们可以使用持续集自动化这个过程
持续集成
使用Travis CI进行持续集成
生成github token
在github点击头像 - setting - Developer settings- Personal access tokens
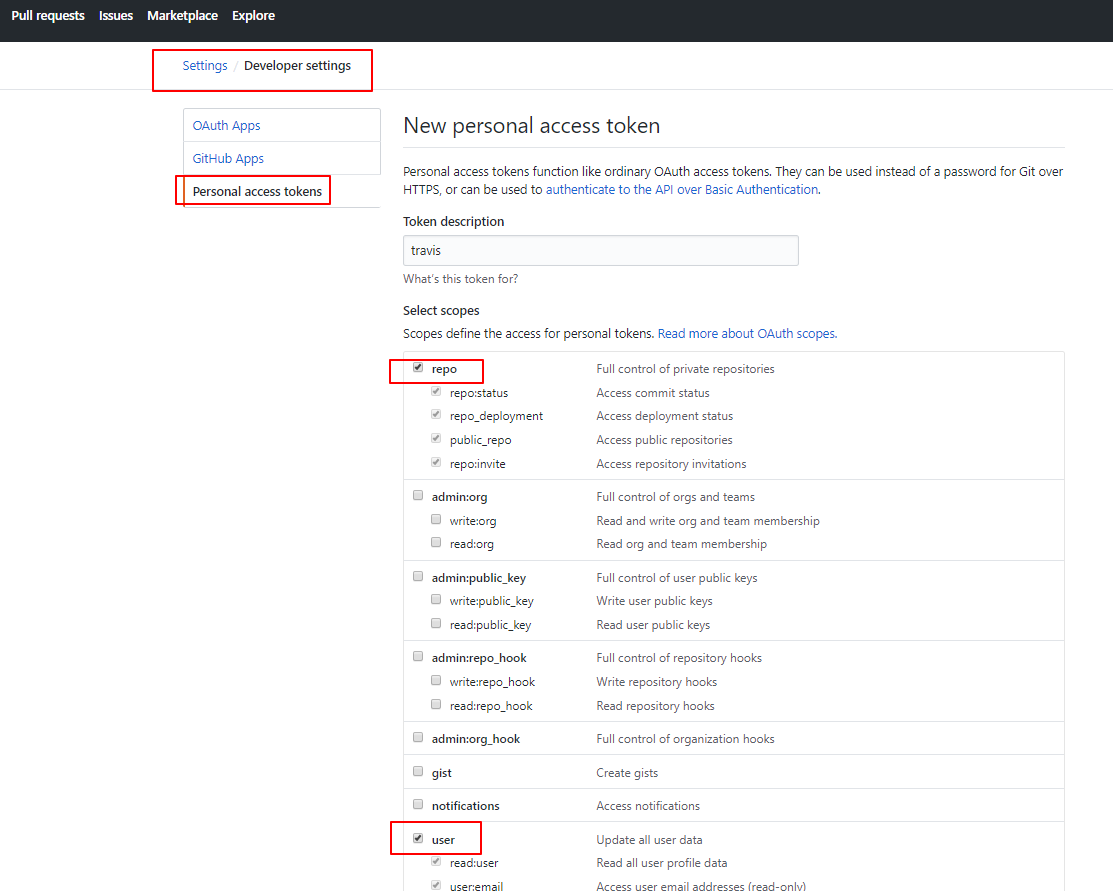
点击底部的生成,token只会出现一次,保存生成的token备用使用Github账号登录Travis CI官网
https://travis-ci.org/account/repositories下选择博客所在的仓库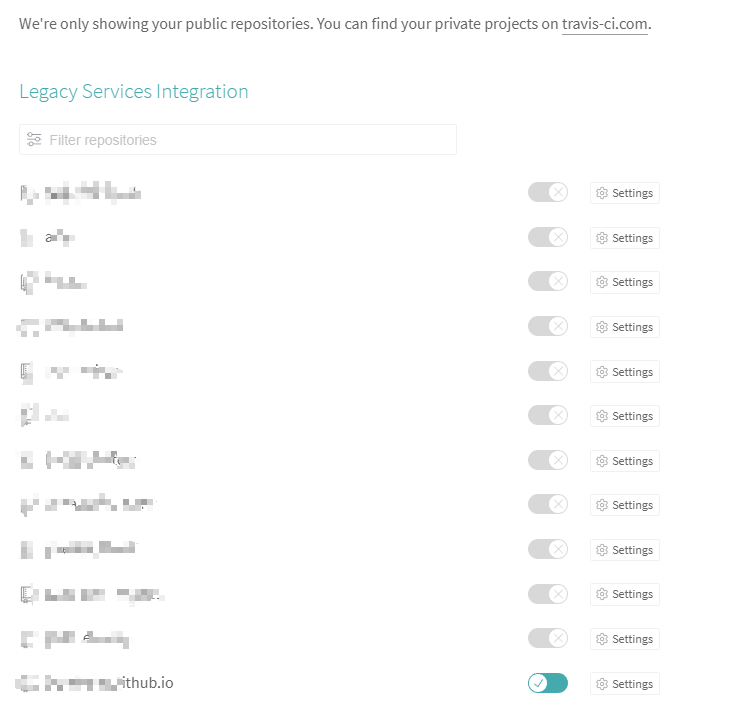
进入项目,在
More options中点击setting添加步骤1中生成的token,key值为
GH_TOKEN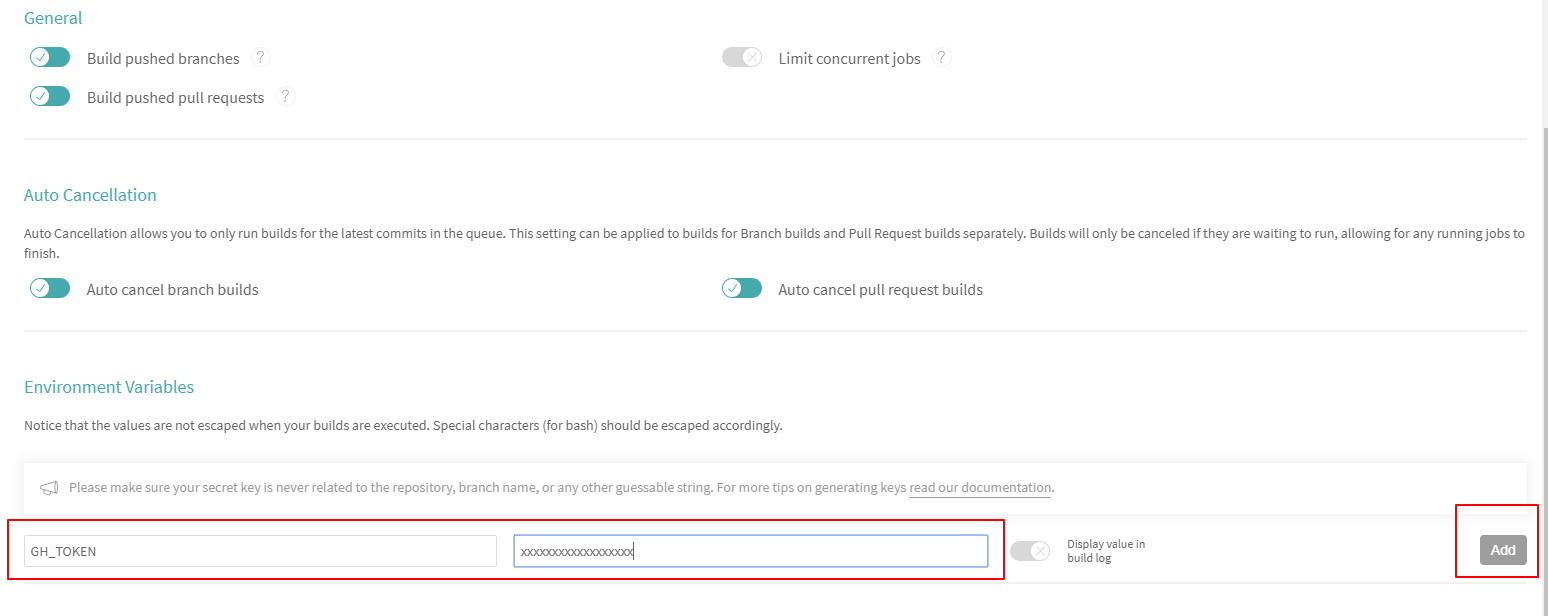
在根目录下新建
.travis.yml文件,添加内容:1
2
3
4
5
6
7
8
9
10
11
12
13
14
15
16
17
18
19
20
21
22
23language: node_js
node_js: stable
# S: Build Lifecycle
install:
- npm install
#before_script:
# - npm install -g gulp
script:
- hexo g
after_script:
- cd ./public
- git init
- git config user.name "这里填你的github用户名,这里假定为jay"
- git config user.email "这里填你的github邮箱"
- git add . -f
- git commit -m "Update docs"
- git push --force --quiet "https://${GH_TOKEN}@${GH_REF}" master:master
branches:
only:
- blog
env:
global:
- GH_REF: github.com/jay/jay.github.io.git注意
GH_REF填写实际的项目地址,是https://后面的内容,不是ssh的地址
现在我们对blog分支推送的任何更新都会由Travis CI将构建后的内容推送到master分支,可以在Travis CI查看构建的过程
可以删除原来手动发布所需的相关依赖和配置,当然保留也没关系
参考
参考