[TOC]
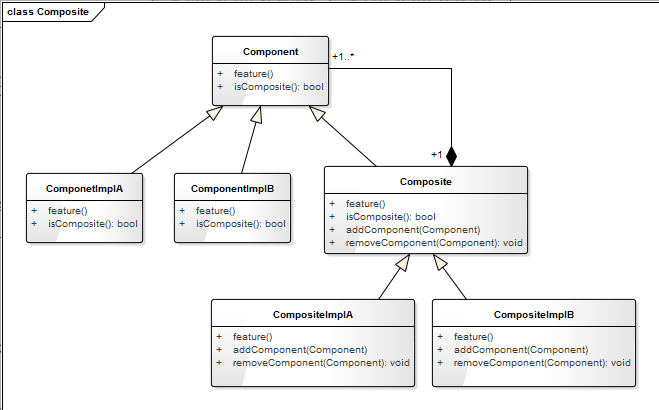
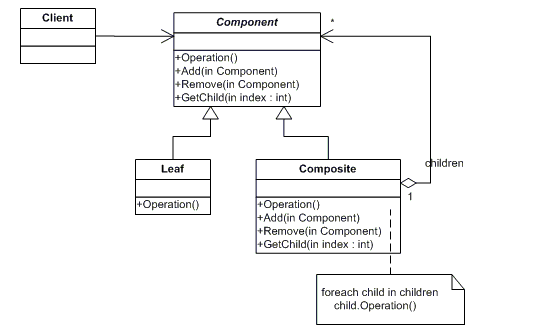
原理
示例
绘图(C#实现)
旧版实现
用绘图这个例子来说明Composite模式,通过一些基本图像元素(直线、圆等)以及一些复合图像元素(由基本图像元素组合而成)构建复杂的图形树。
在设计中我们对每一个对象都配备一个Draw()方法,在调用时,会显示相关的图形。
可以看到,这里复合图像元素它在充当对象的同时,又是那些基本图像元素的一个容器。
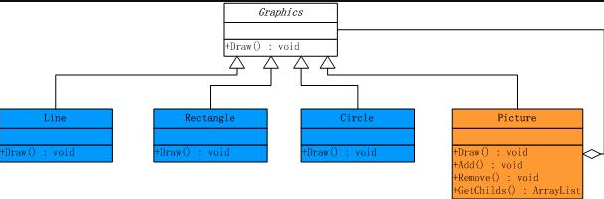
先看一下基本的类结构图: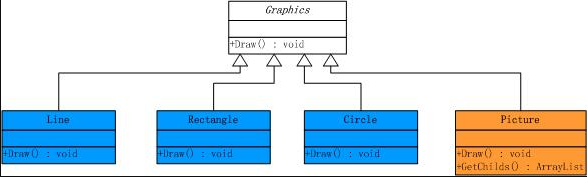
图中橙色的区域表示的是复合图像元素
示意性代码:
1 | public abstract class Graphics |
而其他作为树枝构件,实现代码如下:
1 | public class Line : Graphics |
引入组合模式
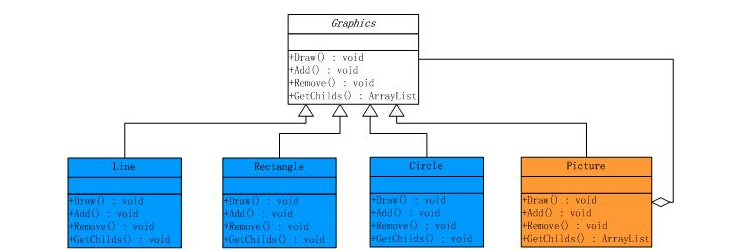
现在我们要对该图像元素进行处理:在客户端程序中,需要判断返回对象的具体类型到底是基本图像元素,还是复合图像元素。如果是复合图像元素,我们将要用递归去处理,然而这种处理的结果却增加了客户端程序与复杂图像元素内部结构之间的依赖。那么我们如何去解耦这种关系呢?
我们希望的是客户程序可以像处理基本图像元素一样来处理复合图像元素,这就要引入Composite模式了,需要把对于子对象的管理工作交给复合图像元素,为了进行子对象的管理,它必须提供必要的Add(),Remove()等方法,类结构图如下:
代码如下:
1 | public abstract class Graphics |
这样引入Composite模式后,客户端程序不再依赖于复合图像元素的内部实现了。
然而,我们程序中仍然存在着问题,因为Line,Rectangle,Circle已经没有了子对象,它是一个基本图像元素,因此Add(),Remove()的方法对于它来说没有任何意义,而且把这种错误不会在编译的时候报错,把错误放在了运行期。
我们希望能够捕获到这类错误,并加以处理,稍微改进一下我们的程序:
1 | public class Line : Graphics |
这样改进以后,我们可以捕获可能出现的错误,做进一步的处理。
上面的这种实现方法属于透明式的Composite模式。
安全的组合模式
如果我们想要更安全的一种做法,就需要把管理子对象的方法声明在树枝构件Picture类里面,这样如果叶子节点Line,Rectangle,Circle使用这些方法时,在编译期就会出错,看一下类结构图:
代码如下:
1 | public abstract class Graphics |
这种方式属于安全式的Composite模式
在这种方式下,虽然避免了前面所讨论的错误,但是它也使得叶子节点和树枝构件具有不一样的接口。
这种方式和透明式的Composite各有优劣,具体使用哪一个,需要根据问题的实际情况而定。
通过Composite模式,客户程序在调用Draw()的时候不用再去判断复杂图像元素中的子对象到底是基本图像元素,还是复杂图像元素,看一下简单的客户端调用:
1 | class Program |
组装电脑(python实现)
只要你对硬件稍微有一些了解,或者打开过机箱换过组件,一定知道 CPU、内存、显卡是插在主板上的,而硬盘也是连在主板上的,在机箱的后面有一排的插口,可以连接鼠标、键盘、耳麦、摄像头等外接配件,而显示器需要单独插电源才能工作。我们可以用代码来模拟台式电脑的组成,这里假设每一个组件都有开始工作和结束工作两个功能,还可以显示自己的信息和组成结构。
代码如下:
1 | class Component: |
测试代码:1
2
3
4
5
6
7
8
9
10
11
12
13
14
15
16
17
18
19
20
21
22
23
24
25
26
27
28
29
30
31def testComputer():
cpu = CPU("Intel Core i5-6600K")
memoryCard = MemoryCard("Kingston Fury DDR4")
hardDisk = HardDisk("Kingston V300 ")
graphicsCard = GraphicsCard("Colorful iGame750")
mainBoard = Mainboard("GIGABYTE Z170M M-ATX")
mainBoard.addComponent(cpu)
mainBoard.addComponent(memoryCard)
mainBoard.addComponent(hardDisk)
mainBoard.addComponent(graphicsCard)
battery = Battery("Antec VP 450P")
fan = Fan("DEEPCOOL 120T")
computerCase = ComputerCase("SAMA MATX")
computerCase.addComponent(battery)
computerCase.addComponent(mainBoard)
computerCase.addComponent(fan)
displayer = Displayer("AOC LV243XIP")
computer = Computer("Tony DIY电脑")
computer.addComponent(displayer)
computer.addComponent(computerCase)
computer.showInfo("")
print("\n开机过程:")
computer.startup("")
print("\n关机过程:")
computer.shutdown("")
testComputer()
输出结果:
1 | 电脑:Tony DIY电脑,由以下部件组成: |
类图如下: